‘Reservoir Dogs’ task – Artefact and Evaluation

After actually filming our Reservoir Dogs task, which proved to be a challenge in itself, working in pairs we managed to edit it; much hard work was put in and in quite a short space of time.  Here is the final artefact edited by Charles and I:

https://vimeo.com/144729990

The actual filming of the artefact didn’t go as well as it could have gone, mainly due to the very limited time that we had to film.  Because of this a lot of our shots are not very good and would have benefited from being re-shot, for example some are out of focus towards the end; but unfortunately due to time restraints we had to move on to the next shot instead of doing another take.

When it came to editing, Charles and I struggled a bit due to the fact that we had limited experience and hadn’t never really edited anything like this before, so a lot of it we had to learn as we went; luckily we picked most of it up fast.  It took us a bit longer to edit than planned as we struggled a bit with the title, but after spending a bit longer on it we managed to get it sorted so it was edited just as we wanted it.  We  had enough footage for the piece, but some of it had to be cut down as most of the closeups went out of focus towards the end; when it was all put together it didn’t look too bad as we had got rid of most of the frames that were out of focus.

We did some research and found the font used by Quentin Tarantino for the title and credits, which was Palatino.  We then incorporated this into our artefact and managed to find the right colour, which was a dark yellow with a slight orange tint to it.  However, by the end of the editing process we realised that the colour wasn’t quite right and changed it to a colour that was closer to the original.  We also added a slight shadow to the text to try and give it the effect that was in the original, although I think that the shadow on our text was a bit too much and that it was just more of a simple black outline that Tarantino used.  It took a lot of trial and error to try and get the correct size and spacing of the text; we started off with a text size that we thought was alright but it turned out to be too big so we had to downscale the size quite drastically towards the end of the editing process.

We added the effect of an old film grain over the top of all out footage to try and get the effect and also the colour of the shot closer to that of the original film; this meant that we didn’t have to use a filter because the grain effect effectively did it for us.  Looking back at the footage it does look like the grain effect is a bit too much and not really necessary in places, but for the most part it achieved the effect that we wanted.  We actually had to decrease the amount of effect that was present in some of the shots, such as the restaurant shot, because it was to much and ruined slightly.

Overall we were all quite pleased with the footage that we shot, considering the amount of time we had to do it.  Charles and I were also rather happy with our editing of the footage, especially because it was something we hadn’t really done before and it gave us valuable experience for the future when it comes to editing our coursework in a few months time.

‘Reservoir Dogs’ task – Filming

When it came to filming our re-creation of the Reservoir Dogs opening title sequence we only had one lesson, which was 50 minutes long, to do it and film all of the shots needed.  This proved very challenging as we would have ideally needed at least double the amount of time that we actually had; because of this some of the shots we took were not as perfect as we wanted them to be but we didn’t have time to re-shoot them.

We first filmed the dolly shot of the characters walking from right to left by the bike shed.  This proved challenging as there wasn’t enough room to make full use of the dolly and be fully effective.  We did a couple of takes when filming this shot to try and get it right and we were happy with the final piece of footage that we got here.  We had to film this part of the scene first out of all of our shots because we wanted to use the dolly, but we could only use it for the first part of the lesson due to another group wanting to use it.

Next we filmed the close up shots of each of the characters; this was probably the hardest bit of footage that we had to shoot for various reasons.  When filming this part we used a long range zoom lens on the camera and placed it on a tripod, with it zoomed in and focused on the faces of the characters in the shot to recreate the effect from the original movie.  We were quickly running out of time and we had to shoot 8 different close ups very quickly but also making sure that they were as close in similarity to the original film as possible.  We had to make sure that in each close up there were the right characters in the background and that they were acting the right way when the camera was filming.  The hardest part was probably trying to adjust the focus as the characters walked towards the camera; I was filming the majority of the closeups and struggled with the focus, so most of the shots go out of focus towards the end of the shot.  However, we didn’t have time to retake most of the shots because we were short of time, but we were relatively happy with them anyway because we were relatively successful in achieving the effect created in the movie.


After that we didn’t have much time left so we had to rush to the school canteen, which we had booked out in one of the planning sessions, to film the shot of all the characters leaving the cafe.  Because of the time we had to film this shot in one take, but we got it pretty much right in this one take and were relatively happy with the result.

Finally we filmed the final shot of the title sequence, which was the one of the characters walking away from the camera and towards a road.  We had about 5 minutes, maybe less, to film this shot and again, had to do it in one take.  But we managed it and didn’t really need to re-take the shot anyway.  It was also quite difficult to film due to another group trying to film in the same location, so we lost valuable time waiting for them to finish so we could film.

Overall, in the time that we were given, even though it was a very stressful 50 minutes, we managed to shoot some good footage that was relatively accurate to the original shots from the film and that we were happy with as a group.

‘Reservoir Dogs’ task – planning

In class we were split into three groups and given the task to replicate as accurately as possible the infamous opening title sequence of Quentin Tarantino’s Reservoir Dogs (1992).

We were given two lessons to plan our recreation of the scene and have been given another lesson to actually film it.  During the planning sessions we established roles throughout the group and recruited other students, who are not in the class, to help act for us; we didn’t have enough people in our group to play all the parts in the first place and also operate the camera.

Cast list:
Charles – cameraman

Finlay – Mr. Blonde (Michael Madson)
Ben – Mr. Orange (Tim Roth)
Tom – Mr. White (Harvey Keitel)
Ben Catchpole – Nice Guy Eddie (Chris Penn)
Jake – Mr. Pink (Steve Buscemi)
Sam Cull – Joe (Lawrence Tierney)
Patrick – Mr. Blue (Eddie Bunker)
Oliver Pinkett – Mr. Brown (Quentin Tarantino)

We also planned out the shots and established who would be standing where in the slow motion scenes so it matched up with the original scenes in the movie, so it was as accurate and as close to the original as possible.  While some of the group was finalising planning for the shots, Tom and I went around school and scouted locations for filming.  We booked out the internet hub part of the school canteen for the opening shot of the scene when the group are in a cafe sat around a table and then get up and leave; in the canteen there are round tables with lots of room around them in a cafe-like setting, which is perfect as we want to get our piece as accurate as possible.

We then found parts of the school to use for the other shots, such as the wall by the bike shed and the main entrance of school.  These locations offered enough room to actually film and were relatively similar to the locations used in the actual scene from the film.  We took test footage in these locations with me in them, using the slow motion feature on Tom’s camera, just to get an idea of what actually filming there would be like and how much room we would actually have.

Preliminary Task – take 2 : Evaluation

After planning, filming and editing our first preliminary task we were told last week to re-do the piece which consisted of someone walking into a room, sitting down in a chair opposite another person and exchanging a few lines of dialogue with them.  This time we had only one lesson to plan instead of two, one lesson to film the piece and one lesson to edit all the footage.

When re- planning the artefact we had to use new camera techniques we had learnt, such as the 180 degree shot, Shot reverse shot and Match on action; we kept virtually the same script but changed all the camera shots, which improved the footage greatly from the first artefact we filmed.

plan

storyboard 1 storyboard 2

In response to the feedback that we received from our first attempt at a preliminary task we agreed to change other elements of the artefact as well from some of the camera shots.  We decided to change the room we were filming to the conference room as the computer room we used the first time round was too noisy and all the computers and equipment left a humming noise in the background of all our audio. The conference room still wasn’t completely perfect as it wasn’t a large room and was filled with a big table, which made filming quite difficult, and there was also some background noise from the surrounding corridors.  But it was till an improvement from our first filming location.

The were some camera shots that were slightly wobbly, for example when we filmed the sign on the door of the conference room, because we had to physically support the camera due to the limitations of the tripod.  Also, in the shot we took of the clock you could see our reflection in the clock face as we were filming, which we didn’t notice until after editing.

This time when filming we were able to use a DSLR camera and an external microphone with a boom pole, which meant that the quality of the footage was better than on our first preliminary task, and hopefully the audio footage would have been better.  However, when using the external microphone we forgot to use headphones so we could hear exactly what the microphone was picking up, so when we came to edit the footage we discovered that there was a constant static noise underneath all our recorded audio.  Because of this we decided not to use the audio recorded on the external microphone, and luckily all the audio was picked up by the camera’s internal microphone so we just used that, even though it was a bit quiet.

Even though there were some faults with our second preliminary task, it was still a big improvement on our first attempt and we were all quite pleased with it.

https://vimeo.com/140639516

Shot reverse shot

Shot/reverse shot is a filming technique where a camera shot shows a character looking at another character that is often off screen, and then the camera shot switches to the other character looking back at the first character.  This allows the viewer to assume that the two characters are looking at each other as they are shown to be looking in opposite directions.  This can sometimes be done with over the shoulder shots and is an example of an eyeline match.

Match on action

Match on action, also known as cutting on action, is a technique used to give a sense of continuity.  It refers to the editing technique where the camera shot changes from one to another that matches the action of the first shot.  Examples of this could be a shot of a man reaching for a door knob, and then the next shot could be of the door opening from the authorised, giving a sense of continuous time when all the edited footage is viewed together.  This can also create a visual bridge that can distract the viewer from noticing any errors or mistakes between the two shots.

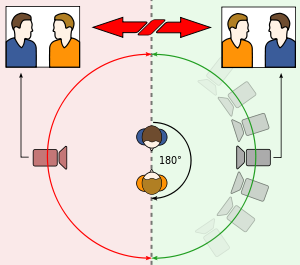
The 180º rule

The 180º rule is used very often in filming and is predominantly used when filming scenes of dialogue; but it can also be used for other types of scenes, not just dialogue.

The rule is that a line, or axis, runs down the centre of the of the scene and that the camera must stay on one side of the line.  It can move anywhere on that side of the line but should not cross it because the two characters would then be facing the same direction and it can be disorientating for the audience.  This allows the camera to do various shots on this side of the line, ie. over the shoulder shots, and it still allows the audience to understand where the characters are positioned in relation to each other without getting confused and allows them to have a greater sense of location.

However, some directors intentionally break the 180º rule for effect, and maybe their intention is to purposefully confuse and disorientate the audience.  It is usually broken when filming action scenes to add a dramatic effect.  This is referred to as crossing or breaking the line of action.

https://vimeo.com/blog/post/180-degree-rule-explained

Preliminary Task – Evaluation

When filming and editing our Preliminary task, we encountered various challenges that we had to try and overcome.  Unfortunately during filming we were one of the two groups that had to use one of the older cameras that didn’t have an separate external sound recorder and microphone.  This caused problems that we didn’t discover until we began editing our footage: the camera quality was quite poor compared to that of the DSLRs and the sound quality was even worse.  Due to the lack of microphone we had to make sure our camera shots were quite close up so as the make sure that the sound of the dialogue was picked up by the camera’s microphone, however we didn’t realise how loud the background noise of the room we were in would be; a constant buzzing sound could be heard in the background of the footage.  This was mainly due to our poor choice of location for filming, as we chose to film in the computer room.  To try and cover up this sound when there wasn’t dialogue we attempted to include various diegetic sound over the top during editing: we added in the ticking of a watch to emphasise the impatience of the interviewer and the lateness of the interviewee, and we also added the squeak of a door when the interviewee entered the room.  This, however, was not particularly successful and the buzzing could still be heard.

After filming and editing, as a class we viewed each piece of footage from all 6 groups in turn and gave feedback and criticism to them, and received a mix of positive and negative criticism ourselves to highlight areas for improvement.  The diegetic sound of the watch ticking that we put over the top of the footage didn’t match up the actual watch ticks that could be seen in part of the footage, as the editing was partly rushed and we hadn’t paid enough attention to detail, which is something we shall do next time.  The hum and buzzing noise in the background of our footage due to poor choice of location was another point that was mentioned, so when filming next we will pay more attention to and think more about choosing the filming locations, and any background noise they may produce.  Next time we will probably choose to not use hand-held camera shots, because when we did when filming this task it left quite wobbly footage and seemed unprofessional.  We maybe chose not the best combination of camera shots as some of them didn’t quite work together, so next time we will hopefully have more time to spend thinking about camera shot combinations and their effectiveness.  When the interviewee entered the room the camera filled them to their chair from the inside of the room, and this didn’t best show ‘someone entering a room’; it would have been better for the camera to follow them through the door from the outside of the room to their chair.  During the filming we took enough footage and had several takes for each shot to make sure we had got the footage as we wanted it, but when it came to editing we used all the footage we had taken, and didn’t have any ‘spare’ footage so if we had needed more due to problems then we would have been in trouble.  To be honest we probably did need more footage overall anyway because our footage, when edited, cut down and put together, was quite short and would have benefited from being longer.

Even though we encountered problems and made mistakes during planning, filming and editing I still enjoyed the task and am looking forward to doing the next so we can improve on what we did wrong in this one.

Preliminary Task – Planning

IMG_2497

This week our teacher, Mr. Jackson, put us into groups of 3 and gave our Preliminary filming exercise.  We have to plan, film and edit a small piece consisting of ‘a character opening a door, crossing a room and siting down in a chair opposite another character , with whom he/she then engages in a few lines of dialogue.  We had to blog our progress in this task as a way of documenting our ideas and planning and also any problems we encounter and how we tackle them.

IMG_2499 IMG_2500 IMG_2501 IMG_2502

My group has finished the planning stage after much deliberation and thinking about ideas for the dialogue, location, and camera shots and positions.  We have decided to have the scene as an interview, with the interviewee as the person who comes through the door and sits down, and we thought, in order to create a story, that the interviewee will be late to the interview.  We thought we could add some comedy as it would be more fun, and also slightly easier to film, with a frustrated and sarcastic interviewer who is not happy that they have been kept waiting.  We decided upon the computer room in the Media block to film out piece as it was the most ‘business’ like room we could find in school at short notice that would be suitable for an interview scene.  In the first planning session we created a basic storyboard for our original ideas but upon further planning our ideas changed and we decided to write them out instead.  We decided to have at least 1 moving camera shot where the camera follows the interviewee into the room so the camera is not completely static for the whole piece and also almost put the viewer in the interviewee’s position and help them relate to them.  We also decided last minute to have out first shots of the interviewer with the camera looking up at him to show he has a position of power and authority.  We have also started planning ideas for editing, for example possible adding a filter over the interviewee’s face to show panic and also possibly (if we have time) any non-diegetic sound such as the ticking of a watch/clock to emphasise the passing of time and the fact that the interviewee is late; this would also emphasise the interviewer’s irritation and impatience.  We have now planned out all the dialogue for  ‘the interview’ in the form of a script and also all camera shots and even basic outfit changes like a change of tie to make the interview idea more realistic.  Once we have filmed the piece we will begin editing it to piece the film clips together to finalise and complete it, and add in any effects such as filters or any non-diegetic sound.